Imagine this: You’ve just spent weeks designing a beautiful, highly precise CNC fixture. The clamps align perfectly, the tolerances are tight, and on paper, it looks like a masterpiece of engineering.
You load the fixture into the machine, hit the green button, and everything runs beautifully for the first three parts. But by the fifth part, something goes wrong. The parts are coming out slightly out of tolerance. By the tenth part, a tool snaps.
You open the machine door and look inside. Your beautiful fixture is buried under a mountain of sharp, hot, oily metal chips. They are packed tightly into the corners, wedged under the clamps, and sitting right on top of the locating pins.
Welcome to the hidden hell of poor chip clearance and evacuation.
In the world of manufacturing, it’s easy to focus on clamping force and part alignment. But if you don't design a clear escape route for your chips, your dream fixture will quickly turn into a production nightmare. Let’s take an easy, plain-English look at why chips get stuck and how to design your way out of trouble.
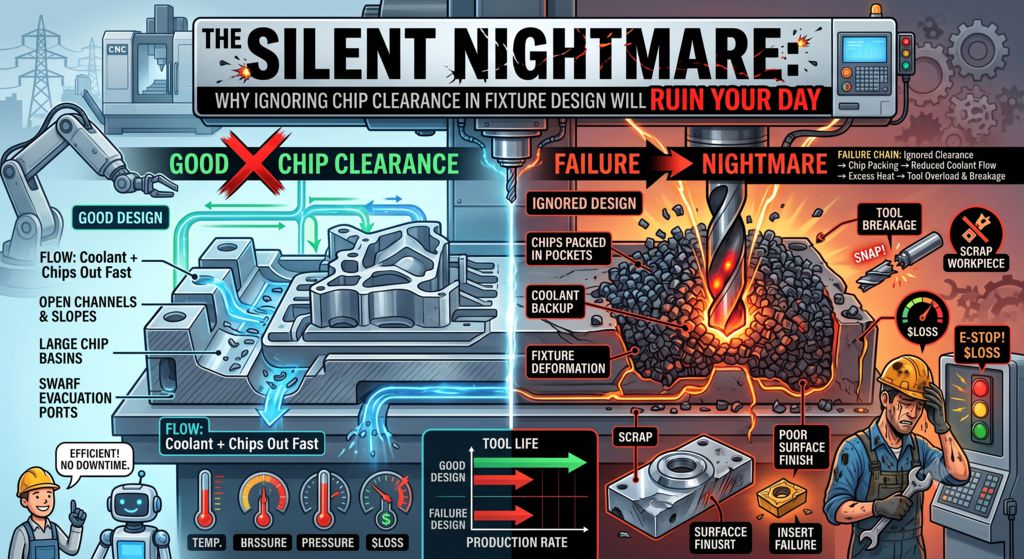
Why Metal Chips Are the Ultimate Saboteurs
To a CNC machine, metal chips aren't just waste—they are active troublemakers. When chips have nowhere to go, they cause three major problems:
- Part Misalignment (The "Crumb in the Bed" Effect): Imagine sleeping on a bed with a single hard breadcrumb under your back. It’s incredibly uncomfortable. In machining, if even a tiny chip gets trapped between your fixture’s locating surface and your raw part, the part will sit unevenly. Your dimensions will be thrown off, and you’ll end up with scrap metal.
- Tool Breakage (Recutting Chips): If chips pile up around the part, the cutting tool will end up slicing through the same chips over and over again. This creates massive heat, causes terrible vibration (chatter), and will quickly chip or snap an expensive endmill.
- Wasted Labor Time: If your operator has to spend two minutes using an air gun to meticulously blow chips out of tight fixture pockets every time they swap a part, your production speed plummets. Over a week, that wasted "blowing time" adds up to hours of lost profit.
3 Golden Rules for Designing Chip-Proof Fixtures
The best way to handle chips is to ensure they never want to stay on the fixture in the first place. Here is how you can achieve that in the design phase:
1. Give Chips a Way Out (Gravity is Your Friend)
Avoid flat, horizontal pockets where chips can easily settle and pool. Wherever possible, design sloped surfaces or large relief channels beneath the part. Think of it like building a house roof—you want a slope so the rain slides right off. If a chip falls, it should naturally slide down away from the critical surfaces and straight into the machine's chip conveyor.
2. Minimize "Blind Corners" and Pockets
Every tight 90-degree corner or deep pocket is a trap for metal chips. If you must have a pocket, design large corner radiuses or open-ended slots. If the pocket is open on the sides, the machine's flood coolant can easily wash the chips out of the way during the cutting process.
3. Elevate Your Locating Pins (Use Rest Buttons)
Never place a raw part flat against a large, solid metal plate. Instead, elevate the part using small, raised pins called rest buttons or standoffs. By raising the part a few millimeters above the main fixture base, you create a safety gap. Any stray chips will fall into the gap under the part, rather than getting trapped between the part and the locator.
Don't Forget the Cleanout: Design for the Air Gun
No matter how well you design a fixture, some chips will still stick due to the sticky nature of cutting oil and coolant. Therefore, you must design the fixture to be cleaned quickly.
- Create "Blow-Out" Channels: Design specific channels or slots where an operator can point an air gun at one end, and blow all the trapped chips cleanly out the other side in a single blast.
- Keep Clamps Accessible: Avoid burying toggle clamps or hydraulic cylinders inside deep recesses where chips can pack tightly around the springs and linkages. If a clamp gets jammed with chips, it can fail to lock properly, creating a major safety hazard.
The Takeaway: Design for the Worst-Case Scenario
A great fixture designer doesn't just design for the clean, shiny part sitting on their computer screen. They design for the messy, chaotic reality inside a working CNC machine.
The next time you are drafting a fixture, look at every pocket, corner, and surface, and ask yourself: "If I poured a bucket of metal chips over this, where would they get stuck?"
By treating chip evacuation as a top priority rather than an afterthought, you’ll save your operators from hand fatigue, protect your cutting tools, and keep your production line running smoothly and profitably.
Get more info, please visit our CNC Turning Parts or Products. Contact us for your customized metal parts.
Have you ever had a project ruined by a sneaky chip trapped in a fixture? What’s your favorite design trick for keeping fixtures clean? Let us know in the comments below!