Every machinist and shop owner knows the sinking feeling of pulling a cutting tool out of a CNC machine, only to find that a premium carbide endmill or insert is completely fried long before its time.
When tools die early, it doesn’t just cost you the price of a replacement. It costs you downtime, ruins your surface finishes, and steals your shop’s productivity.
But here is the good news: tools don’t just “die” at random. They leave clues. By looking closely at how your cutting edge is wearing down, you can play detective, figure out exactly what’s going wrong in your machining process, and fix it.
Let’s take a look at the four most common types of tool wear, what causes them in plain English, and how you can stop them to save serious money.
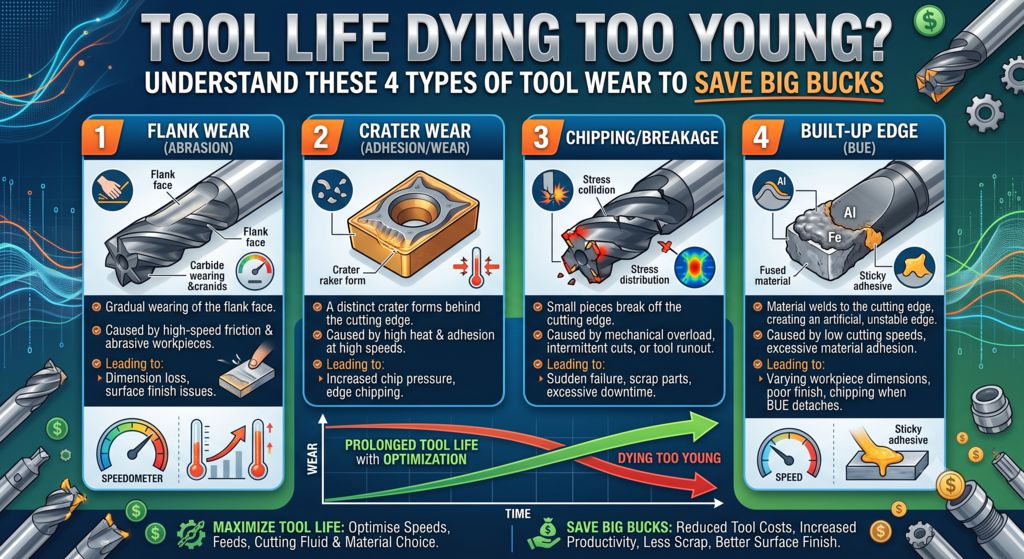
1. Flank Wear: The Natural Aging Process
Think of flank wear like the tread on your car’s tires. As you drive, the rubber naturally wears down from rubbing against the road. In machining, flank wear is the gradual wearing away of the tool’s edge where it rubs against the workpiece.
- What it looks like: A smooth, relatively even flat spot developing right along the cutting edge.
- The Cause: Normal friction. If it happens slowly over a long period, congratulations—you are doing things right! But if it happens too fast, it means your cutting speed (RPM) is too high, creating too much friction heat.
- How to fix it: If your tools are wearing out at lightning speed, try backing off your cutting speed a bit. Also, check your coolant; ensuring a steady flow of lubricant will reduce that friction.
2. Crater Wear: The “Grand Canyon” on Your Tool
While flank wear happens on the side of the tool, crater wear happens right on the top face (the rake face) where the freshly cut metal chips slide across.
- What it looks like: A literal concave crater or dip forming just behind the cutting edge, looking like a miniature pothole or canyon.
- The Cause: Intense heat and chemical reactions. When you cut tough materials like steel or stainless steel, the chips get incredibly hot. As they slide across the top of the tool under immense pressure, they actually dissolve a tiny bit of the tool material over time. Eventually, the crater gets so deep that the cutting edge collapses.
- How to fix it: You need to lower the temperature. Try reducing your cutting speed or feed rate. Switching to a tool with a specialized heat-resistant coating (like TiAlN or AlTiN) can also act as a shield to protect the tool from this chemical heat transfer.
3. Built-Up Edge (BUE): The Unwanted Passenger
Have you ever cut a soft material like aluminum, only to look at the tool and see a big chunk of metal seemingly welded to the tip? That is a Built-Up Edge, or BUE.
- What it looks like: A jagged lump of the workpiece material firmly stuck to the very edge of your tool. It makes the tool look dull and messy.
- The Cause: Ironically, BUE happens when things are too cold and the cutting speed is too slow. Soft, gummy metals (like aluminum or low-carbon steel) get sticky under pressure. If there isn’t enough heat and speed to cleanly shear the chip away, the material physically fuses itself to the cutting edge. When that lump eventually breaks off, it takes a piece of your expensive carbide tool with it.
- How to fix it: Don’t be afraid—speed up! Increasing your cutting speed and feed rate will generate enough heat to keep the material flowing smoothly instead of sticking. Using highly polished tools designed specifically for aluminum and cranking up your flood coolant pressure will also prevent chips from sticking.
4. Chipping and Thermal Cracking: The Sudden Death
If the first three types of wear are like a slow sickness, chipping is a sudden heart attack.
- What it looks like: Tiny flakes or chunks of the cutting edge literally breaking off, leaving a jagged, ruined edge. Sometimes you might see a series of tiny vertical cracks along the edge (thermal cracking).
- The Cause: Interrupted cuts, excessive vibration (chatter), or thermal shock. Carbide tools are incredibly hard, but they are brittle like glass. If your setup is vibrating, or if you are constantly bouncing in and out of a cut, the impact will chip the edge. Thermal cracking happens when a tool gets incredibly hot, gets blasted by cold coolant, gets hot again, and gets blasted again—the rapid temperature swinging cracks the carbide.
- How to fix it: * For chipping: Fix your rigidity. Make sure your parts are clamped tightly, use shorter tools to reduce flex, and reduce your feed rate when entering a cut.
- For thermal cracking: Go all or nothing with coolant. Either make sure your flood coolant is drowning the tool completely and constantly, or turn it off entirely and use a high-pressure air blast instead to keep the temperature stable.
The Takeaway: Listen to Your Tools
Your worn-out tools are trying to talk to you. The next time a tool dulls or breaks, don’t just throw it in the scrap bin and curse your luck. Grab a magnifying glass, look at the edge, and identify the culprit.
By adjusting your speeds, feeds, and coolant based on these four simple wear patterns, you’ll unlock longer tool life, better parts, and a much healthier bottom line for your shop.
Get more info, please visit our CNC Turning Parts or Products.
Contact us for your customized metal parts.
Which of these tool wear types gives you the biggest headache in your shop? Let us know your machining challenges in the comments below!